Showing posts with label Tutorials. Show all posts

Thursday, November 10, 2011

Found! DIY Hair Ties by Tera Rae Stephens!

We've moved to www.cupcakesandcutlery.com - you'll be redirected to this post in a moment.


I have been wanting to buy hair ties like these for about a year now.  Not sure why I can't just bring myself to spend the money and save myself from even more broken hairs and this lovely crown of frizz.  So I was super excited to see this tutorial on how to make your own by Tera Rae Stephens.    


Go Check it out here!  Tera is my hair stylist and is super awesome.  From getting to know her over the last year or so I know that she is a talented craftress, can throw a mean party and is pretty much a super amazing working mom.  I'm really hoping she shares more of those adventures on her blog.  We all stand to benefit from that.  Show her some love!  Oh!  And she's doing a giveaway!  So hop over and enter!  

Sharon
images via Tera Rae Stephens


Tuesday, October 18, 2011

Pumpkin Faced Oranges with Cloves!

We've moved to www.cupcakesandcutlery.com - you'll be redirected to this post in a moment.


Did you ever make clove studded oranges for Christmas when you were little?  We did.  These might be two of my favorite smells in the world.  When my boys started asking to carve our pumpkins, I kept telling them no, that it was too early.  Too many years we cut in to the pumpkins, making adorably spooky faces, only to find them all moldy and gross before Halloween.  So in order to have them feel like they were making pumpkin faces I decided to give them oranges and cloves.


Here is the very detailed tutorial:

Get an orange and some whole cloves.  Shove cloves in orange in any face or pattern you want.  Enjoy.


And the kitchen smells amazing when you are done.  I will let you know that these lasted all of 5 minutes with my boys.  They have some sort of inner driving force that prompts them to take apart anything they just finished making. 


Don't want faces?  You can create any kind of pattern or polka dot look from the cloves too.  I call this one Charlie Brown's shirt. 

For some reason I decided to google and see if anyone else had already done this craft AFTER I did it (duh). And of course there are others.  Check them out for more inspiration here and here.

Sharon
all photos are mine. 


Wednesday, October 5, 2011

Washcloth Ghost Tutorial From Camp Spooky

We've moved to www.cupcakesandcutlery.com - you'll be redirected to this post in a moment.


My readers who are local should go check out Camp Spooky for themselves.  But for my readers who are out of town, you too can create these adorable and super easy washcloth ghosts.  They are cheap to make and would be the perfect activity for a kid's Halloween party.  


Supplies needed:
Washcloth (could also use felt, scraps of fabric, old t-shirts, even a napkin as long as it is fairly tough)
Cotton balls - just a handful per each ghost
White yarn - string or rubberbands would also work
Markers to embellish them

SO easy!  But really cute! 


First, lay out your washcloth, fabric, what have you in front of you. 


Next, place a handful of cotton balls in the center of the washcloth. 


Next, cut a small piece of white yarn.  Gather the washcloth around the cotton balls and tie off with the yarn. 


Of course if you were going to have the kids embellish them, you could have them draw on the washcloth before you added the cotton balls, or once it is complete so they could add a face, etc. 

I know I just shared the link last week for my Halloween ideas from last year, but here is a similar craft I did with fabric and styrofoam.  I have to say, the cotton balls would be WAY cheaper!  


Sharon
all images are mine. 


Thursday, September 22, 2011

DIY Painted Napkins using Izze Soda Bottles

We've moved to www.cupcakesandcutlery.com - you'll be redirected to this post in a moment.


Here is my tutorial for making painted napkins using an Izze soda bottle.  This post perfectly sums up my crafting abilities and process.  Generally when I create a tutorial there are tears, laughter and lots of little hands running away with stuff needed to complete the project.  This was no exception.  I often find myself shaking my head and thinking, "what the heck am I doing."  But at the end of the day I enjoy it so that is why I put myself through the crafting insanity. 


My family loves Izze sodas.  This is the only soda my food allergic son has ever known and it is a product that I feel really good about.  I always have a few cans (not bottles, the are glass and for those of you who know me I am risk and mess averse so the thought of having to clean up broken glass and a sticky soda mess if one potentially breaks is almost too much for me to bare.  No, I do not have a therapist yet but it has been suggested by several people) in the fridge as an extra special treat.  If you read the party blogs, you have certainly seen Izze sodas at a bajillion parties thanks in part to their great taste, natural ingredients and fantastic colors.  But I decided to get creative with the bottles and see what I could come up with.  


First you have to drink the soda.  Both boys really enjoyed this part.  Next, gather your supplies.  I was given a set of cloth napkins by my mom in law when she was cleaning things out.  This was great since I messed up quite a few in a quest to figure out how to do this project.  This really, ridiculously easy project.  That my brain just couldn't get right.  For instance, these are napkins.  If you don't want to through them out after one use you are going to want to use fabric paint.  The above paint is not.  It may or may not have come off in the washing machine.  This was one step above the washable Crayola paints that I had my oldest son do this project with first (yeah, I'm a bonehead).  The little white cup is a wax coated paper cup from a package that I bought via Oriental Trading Company.  These little cups are awesome and everyone should have these around for crafts.  For real. 


The idea is really simple.  Dip the bottle in paint and stamp it down on the fabric.  Since the top and bottom of the bottle are different sizes its like having two stamps in one.  AND if you didn't take the bottle cap off and empty the bottle first, you could also use the bottle cap as a stamp which would probably create more of a full painted circle instead.  But I didn't try this.  And it could get paint around where you want to drink from later on...Please note that my son has no shirt on in an effort for him to not get messy.  And he only dropped the bottle once (it did not break, yeah!).


Now, here is where my brain really let me down.  I don't use paints a lot in my crafts so I didn't realize how thick and stiff some of the circles might end up (even after running them through the wash to see if it would soften them up).  So, say you decide to wipe your mouth with your amazingly designed cloth napkin.  You probably don't want to end up with cuts on your face from the stiff paint.  The first and second picture show napkins with pretty scratchy paint circles.  The last picture shows what happens when you decide it makes sense to add water to the paints.  Too much water.  Actually, this last option could have turned out cool had I added even more water and created a sort of watercolored effect.  And chose paint colors that were hideous.  


This gold napkin was the final and most perfect napkin.  Although there were a few rough spots, they certainly wouldn't scar your guests.  I decided to add water, little by little until I came up with a consistency that wasn't too watery but wouldn't dry hard (how's that for vague).  The pattern I did on this napkin was sort of like an extra large chevron pattern.  I didn't get a good shot of the whole napkin though.  Maybe it got a little bit of soda on it before I could take that shot and maybe, just maybe that frustrated me and I threw it across the room.  


I also love the Izze logo.  It's so bright and cheerful.  I decided to take the bottle, when I was done using it to paint the napkins and paint the bottle itself.  I didn't take off any of the stickers, simply used a few coats of white spray paint, taking care to cover the logo so it would stay vibrant pink.  Then I dipped the bottle in a little watered down gold paint. 

I'm totally not the most artistic person so I know that there are so many other patterns that these bottles can create.  But I do like taking things and using them in a new way.  I hope this inspires you all to think of ways to reuse your Izze soda bottles.  As for the soda, I'm thinking I have a great idea for how to use some of them in a cocktail.  Shucks, more recipe testing...

Follow Izze on Facebook and Twitter and read their blog!!!


Sharon
All images are mine. 

*I received Izze product to review for this post.  But as I said before, this is something that we always have in our house.  I support this brant.  They are awesome.  And that is MY opinion. 


Wednesday, May 11, 2011

Fabric Napkin Ring Tutorial using Glue Dots

We've moved to www.cupcakesandcutlery.com - you'll be redirected to this post in a moment.


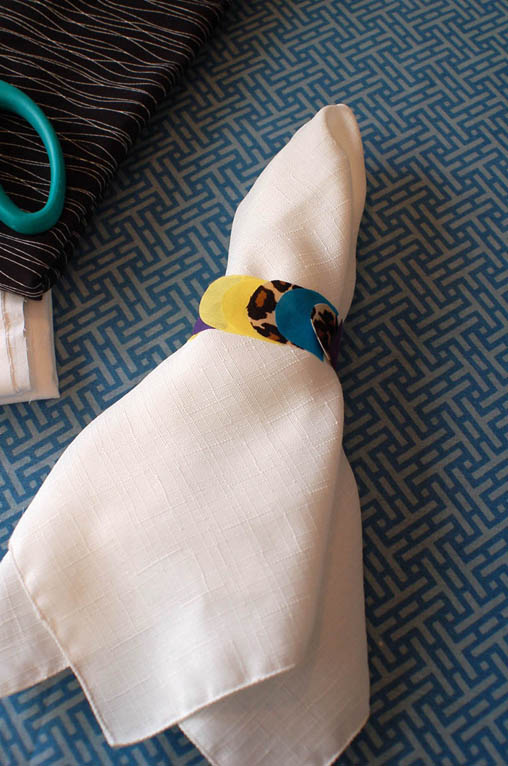
We hope you are enjoying the tutorials that Lauren and I have been sharing with you from a recent Glue Dots sponsored project.  Through the tutorials you are able to see glimpses of some of the finished items that we created for them.  We are so excited to be able to share the full project with you and will do so as soon as we can.  For now, here is how we created a fabric napkin ring using Glue Dots craft dots.  Of course these can also be made with paper but I love the fact that these are ridiculously easy to make but don't look like it.  The look can also be changed by making these in one patterned or colored fabric, mixing multiple coordinating fabrics, or even variations of the same color (ombre is the new fringe).


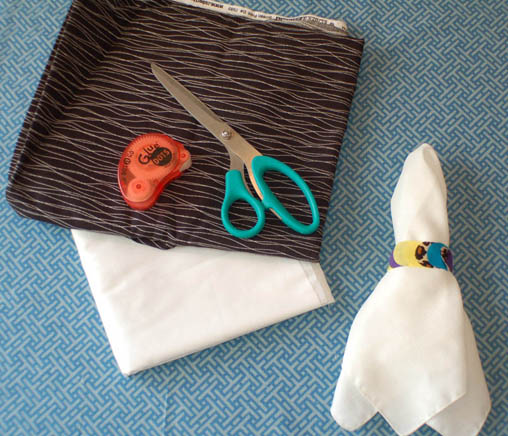
Supplies:

Small piece of fabric - 2 strips at approximately 2" x 14" for each napkin ring (or multiple fabrics depending on the finished look you are going for)
Scissors
Glue Dots Craft Dots
Cloth napkins (a smaller version of the napkin ring would even work really well with paper napkins)


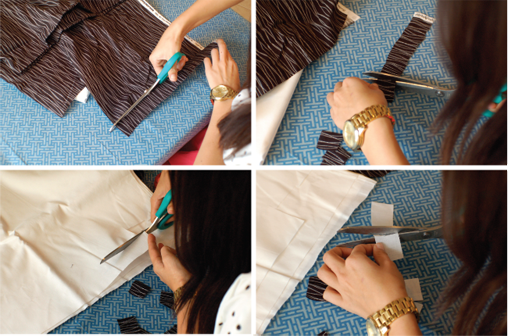
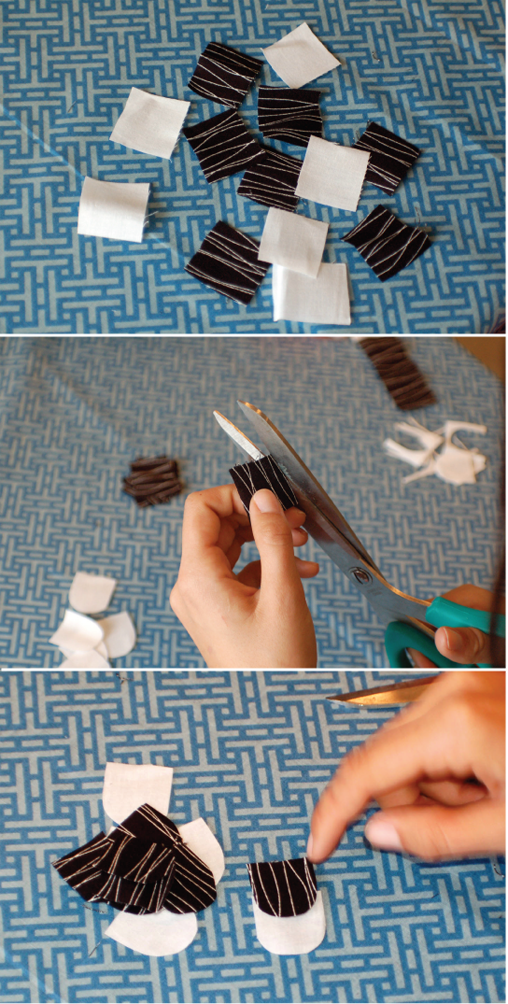
Begin by cutting each fabric you plan on using in to a strip, approximately 2" x 14" (note, the more fabrics that you want to use, the shorter your strip needs to be).  Then cut the strip in to approximately 2" x 2" squares.  You will need approximately 14 2" x 2" squares for the finished napkin ring.   


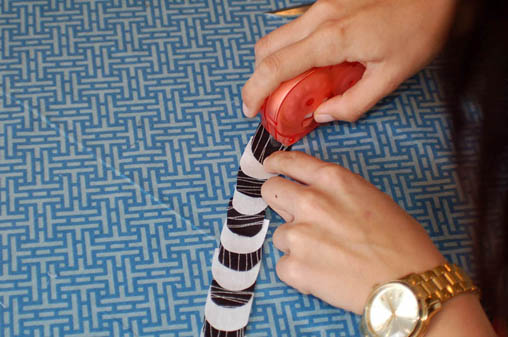
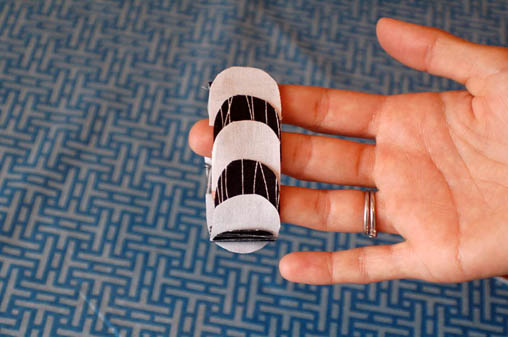
Next, round the corners on one side of each square.  Begin to layer them in whatever pattern you prefer. 


Using the Glue Dots Craft Dots, adhere the layered rounded squares to each other.  Wrap the layered strip around the cloth napkin to confirm the length needed before gluing the strip to its other end creating the ring. 


Done!  It's that easy.  Glue Dots work like magic on fabric and allow me to create a ridiculous number of things out of fabric that this non-sewer usually wouldn't be able to do.  For the last and final tutorial this week, hop over to A Fabulous Fete tomorrow for an adorable little treat bag! 

Sharon

Tuesday, May 10, 2011

Fabric Flower Tutorial with Glue Dots

We've moved to www.cupcakesandcutlery.com - you'll be redirected to this post in a moment.

Photo and graphic by A Fabulous Fete

Jump over to A Fabulous Fete today to see this super easy fabric flower tutorial.  With just a few items that you most likely have laying around the house, you can create these awesome blooms in time for your next dinner party.  The Glue Dots make this so easy!  Come back here tomorrow for a fabric napkin ring tutorial.  


Sharon

Monday, May 9, 2011

Fabric Fringe Straw Flags with Glue Dots

We've moved to www.cupcakesandcutlery.com - you'll be redirected to this post in a moment.

Page Redirection If you are not redirected automatically, follow the Any Text Note Here

A few months ago I was asked to work on a special project for the new Glue Dots website.  I immediately asked Lauren of A Fabulous Fete to partner with me and we were off and running.  While the project is still in the works (and we can't wait to share it with you when it's ready!) we thought we would give you all a sneak peak (above) and provide some tutorials for several of the elements that we used. 


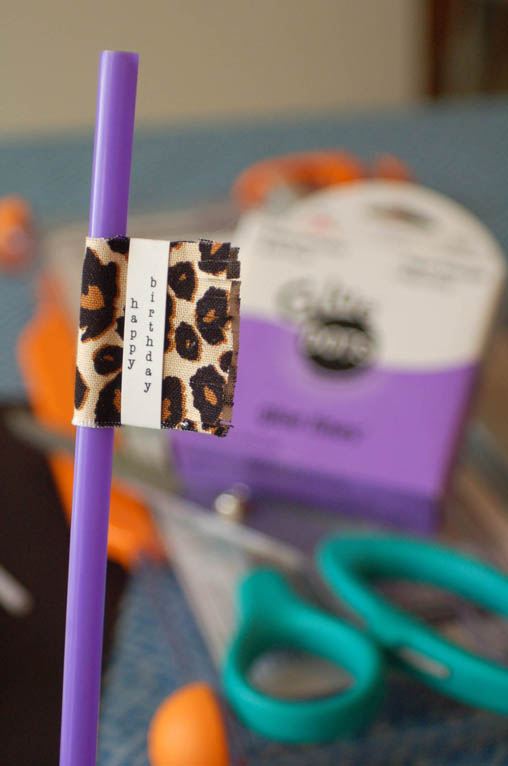
First up is this adorable fabric fringe straw flag.  I adore using fabric in my party decor.  It adds a great textural element and there seems to be an endless supply of colors and patterns to choose from at a very low cost.  I never expected the Glue Dots to work on fabric.  Lauren taught me otherwise.  And because I have a very heavy hand with the glue gun, I prefer to work with Glue Dots now, for many of my fabric projects.  Once in a while, the Glue Dot might not readily stick to the fabric.  With just a little extra pressure from your nail, it usually does the trick.  These straws, because of the personalization quality of the paper embellishment, can be modified to fit any occasion.  Let's do this.


Supplies:
Straw
Fabric (only a small piece is needed for each flag so total amount depends on how many flags you expect to make)
Paper
Paper Cutter
Scissors
Glue Dots Mini
Glue Dots Glue Lines


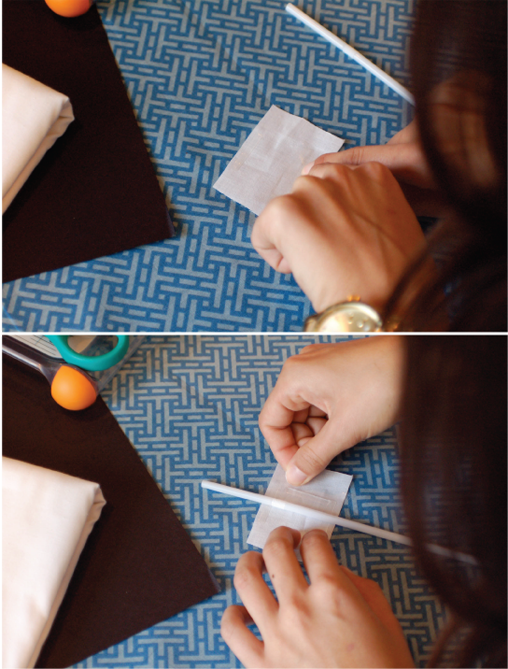
Begin by cutting a rectangle of fabric approximately 2" x 4".


Set the rectangle in front of you with the longer sides at the top and bottom.  Use a Glue Dots Glue Line in the centers of the long sides along the top and bottom edges of the rectangles.  Place your straw in the center of the Glue Lines leaving about an 1 1/2" of the straw sticking out above the fabric.  Place a third Glue Line to one side of the straw.


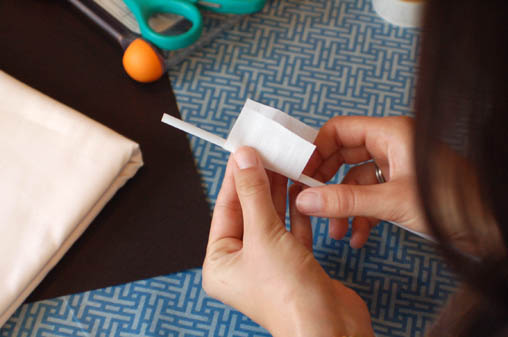
Fold the fabric around the straw and secure it to the Glue Line.


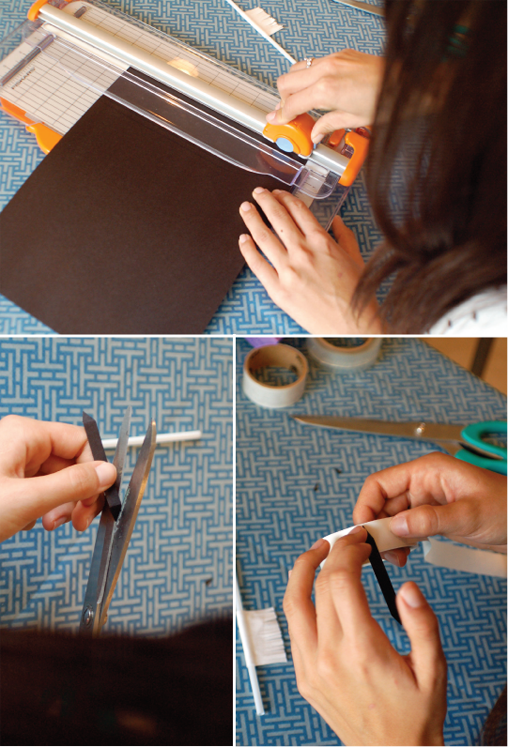
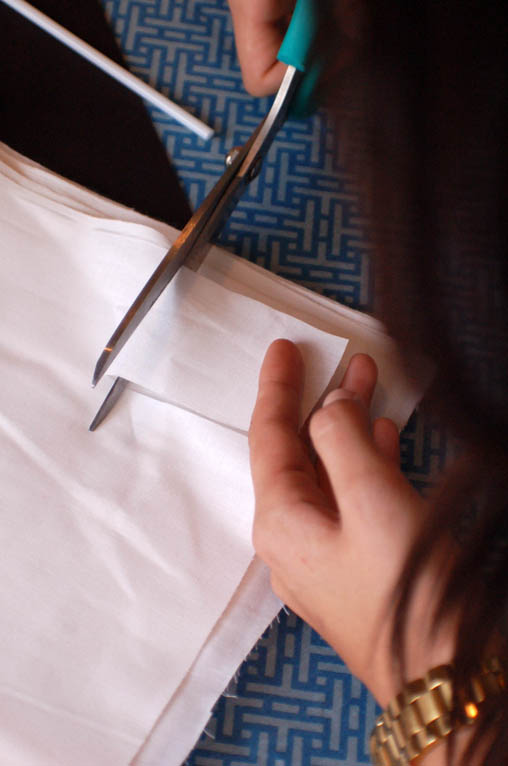
Trim the edge of the fabric to be even and then create the fringe by cutting the fabric at random intervals, fairly close together, perpendicular to the straw.  You can cut very short fringe, or longer fringe just try to keep the cuts consistent in length. 


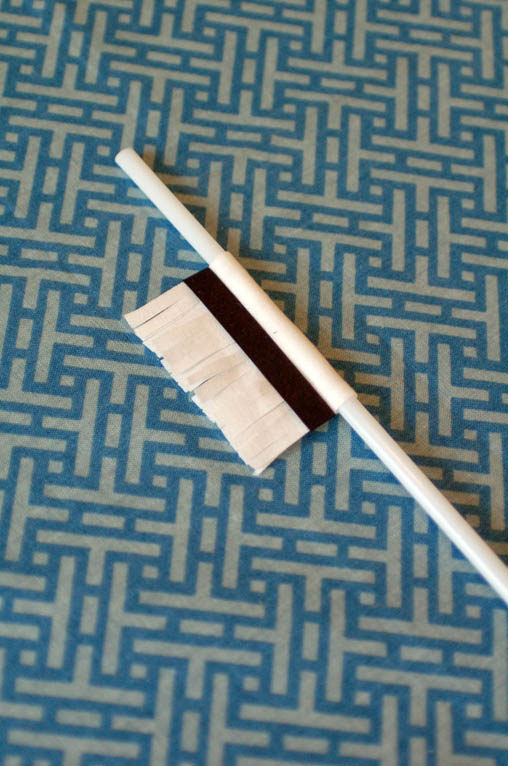
Next you will add your paper embellishment.  Here we just used a solid colored paper.  But this is your opportunity to really add some personalization.  Print out a sentiment on normal printer paper (no cardstock needed) and then cut it as we've done here.  Cut the strip approximately 1/4" x 2 1/2".  Cut the ends into points.  Next, center the strip on top of your flag and fold the ends towards the bag.  Use Glue Dots Mini Dots (one on the back of each pointed end) and a Glue Line on the back of the strip. 


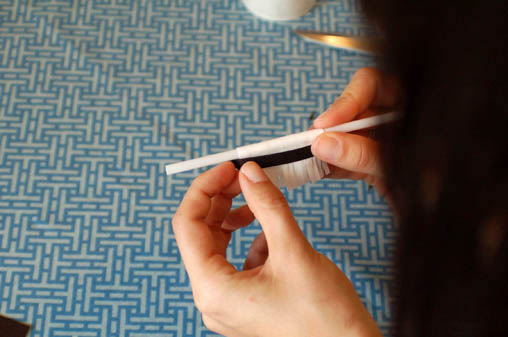
Adhere to the fabric straw flag. 


And there you have it.  Super simple, but a great statement maker at your next party. 

Check out Lauren's blog tomorrow and Thursday for more tutorials and I'll have another one up on Wednesday.  

*We received Glue Dots products for participating in the project.  And I love them. 

Sharon
All photos are mine. 


Wednesday, May 4, 2011

Papel Picado-esque Straw Flags

We've moved to www.cupcakesandcutlery.com - you'll be redirected to this post in a moment.

Page Redirection If you are not redirected automatically, follow the Any Text Note Here

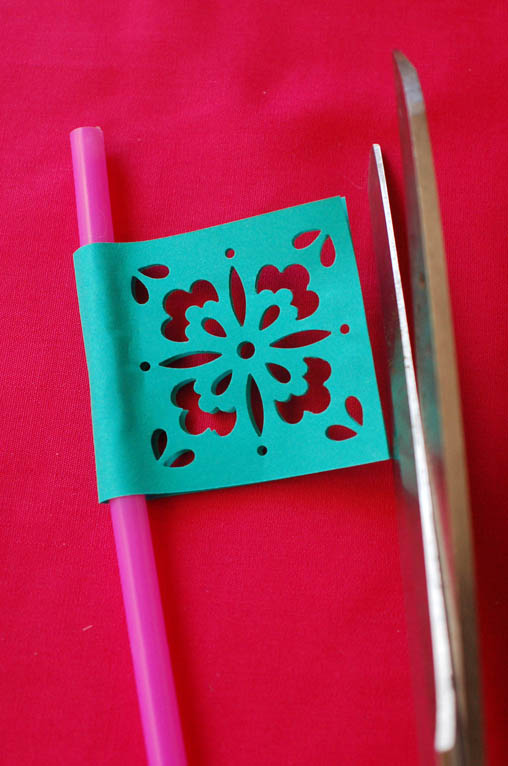
So I had this idea that I had to try out.  I love the papel picado flags that you sometimes see at fiestas.  They look super intricate and I wouldn't have the first clue, or patience, how to make the banners.  But I wondered about a mini version of it done as a straw flag.  Turned out pretty cute so I thought I would share.  Much like my cooking, my crafts tend to be a little less than precise.  And since my 2 year old decided he didn't need to nap today, there was extra activity around the craft table.  


Supplies:
Piece of paper
Paper cutter
scissors
Glue Dots Glue Lines
Glue Dots Craft
Glue Dots Mini Dots
A decorative Martha Stewart Anywhere punch
Straw


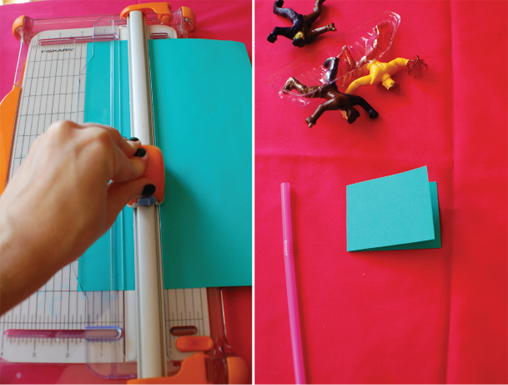
Cut a strip of paper to be 1 3/4" x 4 3/4" (this will depend on the decoration of the punch really).  Fold the paper in half.


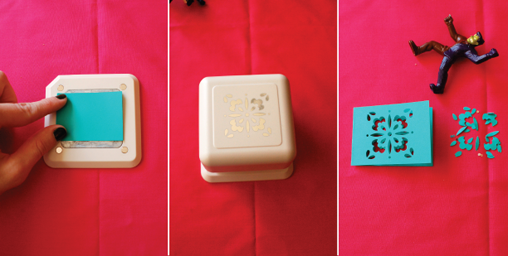
Use the decorative punch making sure to allow for plenty of room for the straw near the fold.


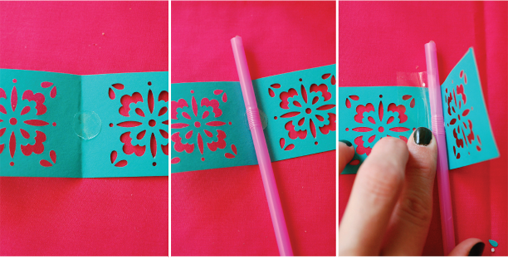
Place a Glue Dot Craft Dot in the center of the fold.  Secure the straw to the dot.  Add a Glue Dots Glue Line to one side of the straw.  You are going to need to match up the punch on both sides before you get the back side of the paper to adhere to the Glue Line.  


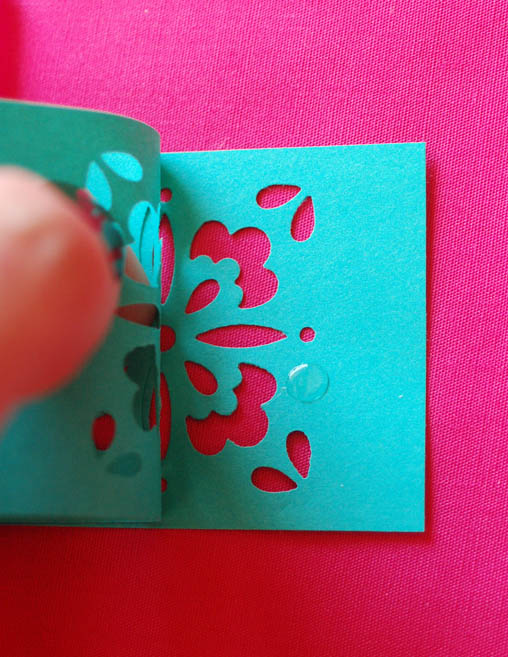
Use a Glue Dots Mini Dot near the edge to help line up the decoration. 


Trim the edge with scissors.  Insert in to beverage and enjoy.  While not a traditional Mexican folk pattern, the decorative cut outs still look pretty cool.  

Sharon
All photos are mine.  

Thursday, April 14, 2011

Plastic Ruffles and Real Parties

We've moved to www.cupcakesandcutlery.com - you'll be redirected to this post in a moment.

photo via Her Royal Heinous, Queen Bee

I got an email yesterday that made my day!  A wonderful blogger named Amelia emailed to thank me for sharing the tutorial for the plastic streamers I did and that she used them recently at a party.  Yeah!!!  And look how adorable the party turned out!!!  

photo via Her Royal Heinous, Queen Bee

Check out the cute colors and adorable styling!  Of course I adore the cupcake stand with the Eiffel Tower since I have a niece named Paris...

photo via Her Royal Heinous, Queen Bee

And the baked goods!  CUTE!  Go check out her post here to see more photos and details of the party.  And remember the HGTV Easter Tablescape article that was making the rounds?  Well Amelia's was one of them featured!  This gal has some talent!  Oh and did I mention that she called my tutorial for the streamers "brilliant"?  Just saying...

Sharon

I'm racing the clock to get up pictures of my own Easter project!!  I've gone completely bonkers with my son's 5th bday party (today is his actual bday so you know I gotta spoil him today too!) a week from Saturday, so I'm finding time to post really hard!  But the Easter decor is totally worth it so check back!!!  

Monday, February 28, 2011

The cutest ruffled streamers from plastic tablecloths!

We've moved to www.cupcakesandcutlery.com - you'll be redirected to this post in a moment.


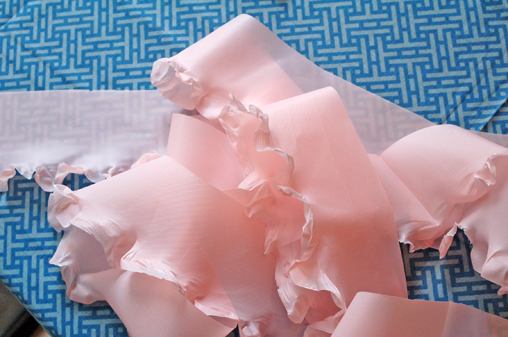
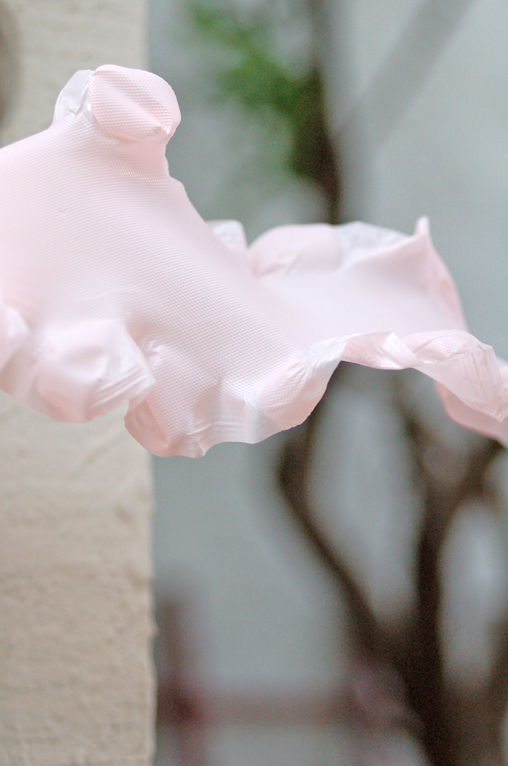
How cute are these!  I'm not even sure how this idea came to me (and it has probably already come to someone else out there too...) but I started thinking about how sometimes when you stretch plastic it warps it and creates a sort of lettuce edge.  I gave it a try and they turned out super cute.  So with just using a cheap plastic tablecloth you can create bunches of darling ruffled streamers.


This streamer above was the white version I tried a few weeks ago.  Now, these plastic streamers might not work for someone who is a total perfectionist and needs everything to look super finished and polished.  For me, however, these are perfect!  My first intro to ruffled garlands was from the radically talented Jenny of Hank and Hunt.  Hers are made from fabric and are gorgeous but since my sewing skills are elementary at best, there was is chance that I could recreate those.  If by chance you are a sewing maven, go check out her tutorial here.  When I read it I thought for a very brief second that I might be able to, in fact, give them a shot.  But alas, no way.


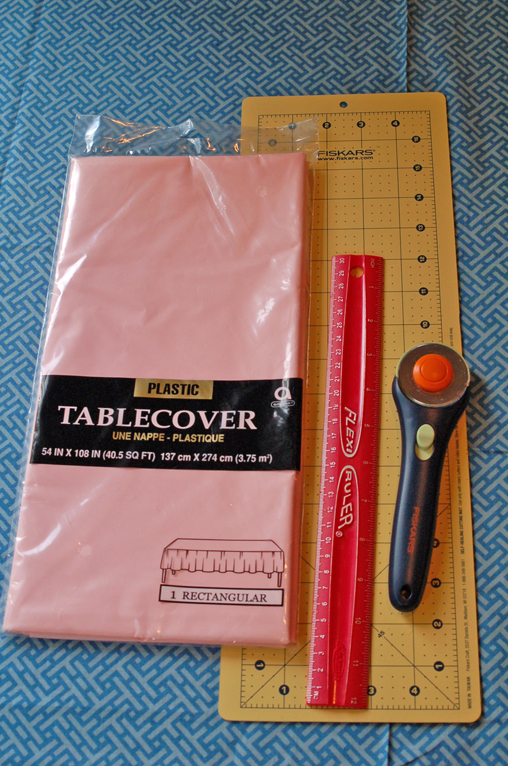
I have a bunch of plastic tablecloths on hand so I'm not sure of the exact cost but I would have to say each would be between $1 and $2.  And because I get bored very easily when putting together a tutorial, I didn't cut the whole cloth to see how many garlands you could get out of it.  Here is my estimate:  a bunch, ok I'd guess about 15 depending on the width you cut.  I'd also like to point out the wrinkles in my cute fabric tablecloth.  Ain't no chance I'm going to be ironing things before I do a tutorial.  Given that most of them take place during a nap time, and I'm lazy, chances are good that you will be seeing wrinkles in most of my instructions.


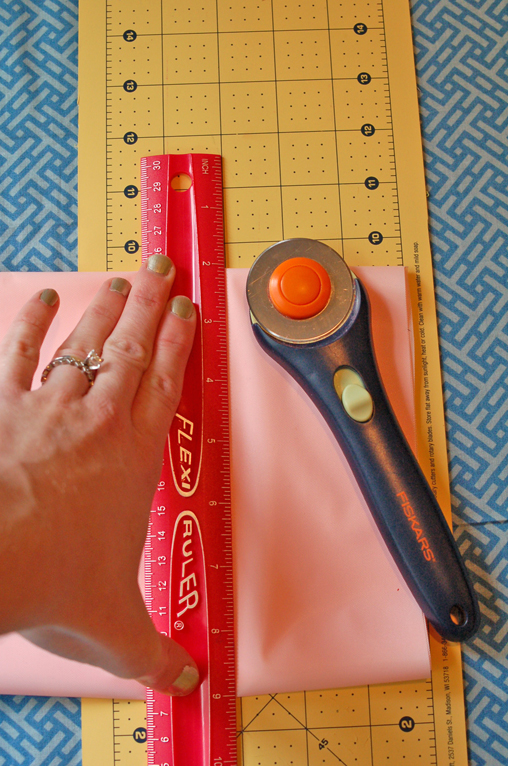
Do not unfold the tablecloth once you take it out of the package.  You will want to find the side with the end of the tablecloth, not the fold, so when you cut you will get a strip.  And thanks to that last sentence I could quite possibly be the worlds worst tutorialist.  Cut as many strips as you want.
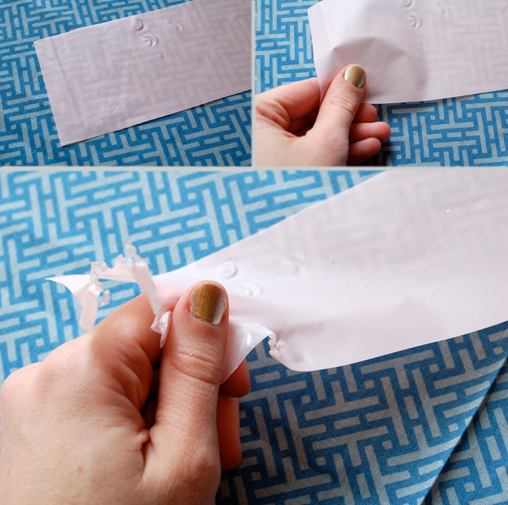

If only I had a third hand this portion of the tutorial would be more informative.  Basically you will want to the plastic in one hand between your thumb and pointer finger and hold the plastic the same way in the other hand right next to the first hand.  And pull your thumbs away from each other.  Give it a test so you can figure out how much and how far you should stretch it.  The good thing about these is that they are never going to come out exactly the same as the last stretch so variety is fine.  Also, you will tear the plastic once in a while.  As long as you haven't torn it clear through to the other side, it is also fine. The tear sort of ruffles as well and blends in.  I wouldn't point the tears out to my party guests but I would totally use the garland.


Stretch down one length of the plastic strip and then flip the strip over and do the other side.


I did this when my husband was out of the house.  When he got home he thought they were really cool but swears it must be too time consuming.  Uh, hullo!  I did it!  It's totally not time consuming.  And this is one of those party projects you could easily do while watching tv.  I even tried putting two strips of the plastic on top of each other to stretch two at once.  It worked great!
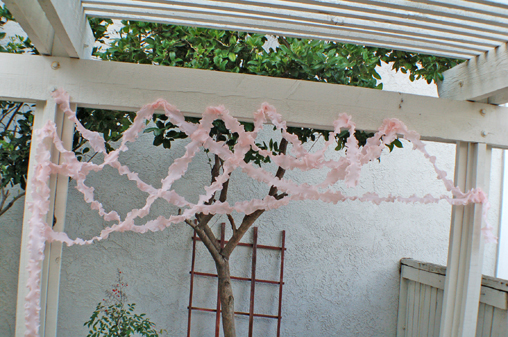

I'm not sure if you all have heard but California had some "weather" this weekend.  It was freezing outside the day I did this (you guys, it was like 54).  So I literally stapled these babies up, took as many pictures as I could and ran back inside.  I could have hung them up cuter but quite frankly my fingers were beginning to get frost bite (yes, I'm a baby).  But here is the amazing thing.  They are still up in my backyard as we speak.  They have been outside through rain, hail, wind and sun.  They look exactly the same as when I first put them up.  These would be so great for anywhere that is windy or has lots of moisture in the air.


They are also SUPER lightweight.  Although I used my staple gun I am pretty sure that depending on what type of surface you are trying to attach to, most kinds of tape should be able to hold them.


I think what I like most about the idea of using a plastic tablecloth to make really cheap, really cute ruffles is that you can make a ton for next to nothing.  I can see using a ton of them, all different colors for a crazy photobooth back drop.  Which would cost you around $5.  While it does take some of your time to make them, you could make a huge impact with these around your party.


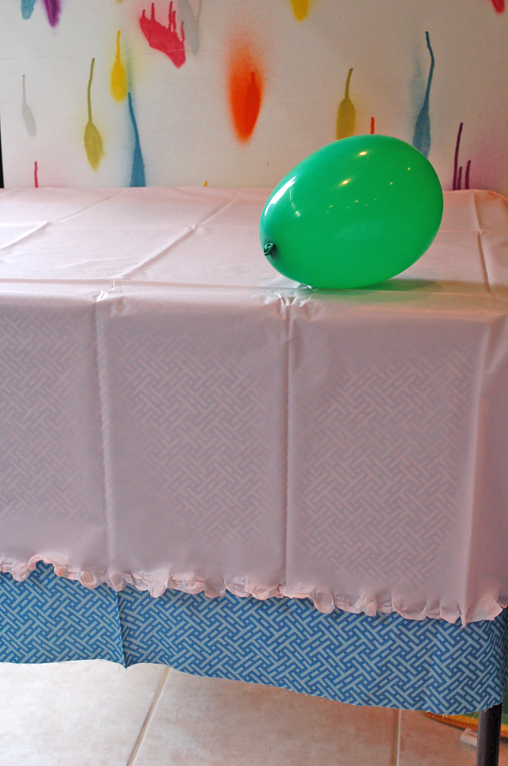
I also wondered if you could do it around the edge of the tablecloth to get a super girly ruffly look.  You totally can!  Don't judge my composition.  I was working against the clock here people.


Wait, what's that you say, Sharon.  It was freezing outside the day you did this tutorial?  Oh and there is your son barefoot out on the freezing concrete with no jacket.  And to you I say, yes.  You are right.  I think this shall secure the sarcastic mother of the year award for me.  But I just needed one quick picture of this last garland.  This is made from a black utility trash bag.  I just needed to see if it would work.  It did. 

Tip Junkie handmade projects

Sharon
LinkWithin
Related Posts Plugin for WordPress, Blogger...